学习思路
- 学会怎么用
- 为什么这样用
使用步骤
- 创建 “mybatis-config.xml” 配置文件
- 创建好 “mapper.xml映射文件”,并在 “mybatis-config.xml”配置文件中配置好 mapper.xml 的路径
- 使用 SqlSessionFactoryBuilder创建—->sqlSessionFactory—-> sqlSession
- 调用 sqlSession(“mapper.xml中的id,如果有 namespace 则使用 namespace.id。”,”需要传递的参数“) 进行 CRUD
基本使用例子
1 | try { |
①、一些基本使用方法
1.切换环境
sqlSessionFactoryBuilder.build(Resources.getResourceAsStream(“mybatis-config.xml”), ==”environmentID”==);
1 | // 使用指定数据库 |
②、各个环节详细解释
1.mybatis-config.xml 配置文件
1 |
|
注意
default 配置默认的 environment id
事务管理器
采用JDBC的原生事务机制:
- 开启事务:conn.setAutoCommit(false);
- 处理业务……
- 提交事务:conn.commit();
MANAGED 交给容器去管理事务 —>一般可以交给 spring 或者 springboot 去管理,当 mybatis 找不到容器支持时:也是没有事务。
不区分大小写
可以 使用 properties 外部文件
导入文件
2
3
4
5
<properties resource="jdbc.properties">
<property name="jdbc.username" value="root"/>
<property name="jdbc.password" value="root"/>
</properties
- properties 有两个属性 resource 和 url
- resource 从类的根路径开始找
- url 则从指定的url加载,假设文件放在d:/jdbc.properties,这个url可以写成:file:///d:/jdbc.properties。注意是三个斜杠哦。
使用 变量
2
3
4
5
6
7
8
<dataSource type="POOLED">
<!--${key}使用-->
<property name="driver" value="${jdbc.driver}"/>
<property name="url" value="${jdbc.url}"/>
<property name="username" value="${jdbc.username}"/>
<property name="password" value="${jdbc.password}"/>
</dataSource>mappers 也有两个属性 与 properties 相同。
- resource 从类的根路径开始找
- url 则**从指定的url加载
1.1重要 修改数据源
但凡为 程序提供 Connection 对象的都叫做数据源
1 | <dataSource type="POOLED"> |
type 设置类别三选一 type=”[UNPOOLED|POOLED|JNDI
- UNPOOLED
- 不使用连接池。
- POOLED
- 使用 mybatis 自己实现的数据库连接池
- JNDI – 这个数据源实现是为了能在如 EJB 或应用服务器这类容器中使用,容器可以集中或在外部配置数据源,然后放置一个 JNDI 上下文的数据源引用。这种数据源配置只需要两个属性:
initial_context– 这个属性用来在 InitialContext 中寻找上下文(即,initialContext.lookup(initial_context))。这是个可选属性,如果忽略,那么将会直接从 InitialContext 中寻找 data_source 属性。data_source– 这是引用数据源实例位置的上下文路径。提供了 initial_context 配置时会在其返回的上下文中进行查找,没有提供时则直接在 InitialContext 中查找。
2.mapper.xml 文件配置 与使用 配置传入参数
使用步骤
- 1.配置扫描路径
- 1.可以在 mybatis-config.xml 或 直接在 springboot 的配置文件中进行配置
- 2.编写 sql语句
- 3.调用并传参。
传参
类别
按数量划分
一、多参数
方案:一、直接传参
底层原理:
在多个参数的情况下,mybatis 会在底层创建一个 mapper 集合。
将传入的参数 封装为 arg0/param0 为key的集合。
#{xxx}
xxx应该写 arg0 按传入参数的下表开始。
是好处也是痛处 —->解决方案 @Param 注解 来写名字
案例分析
需求:通过name和sex查询。
1 | /** |
执行结果:

异常信息描述了:name参数找不到,可用的参数包括[arg1, arg0, param1, param2]
修改StudentMapper.xml配置文件:尝试使用[arg1, arg0, param1, param2]去参数
1 | <select id="selectByNameAndSex" resultType="student"> |
运行结果:

再次尝试修改StudentMapper.xml文件
1 | <select id="selectByNameAndSex" resultType="student"> |
通过测试可以看到:
- arg0 是第一个参数
- param1是第一个参数
- arg1 是第二个参数
- param2是第二个参数
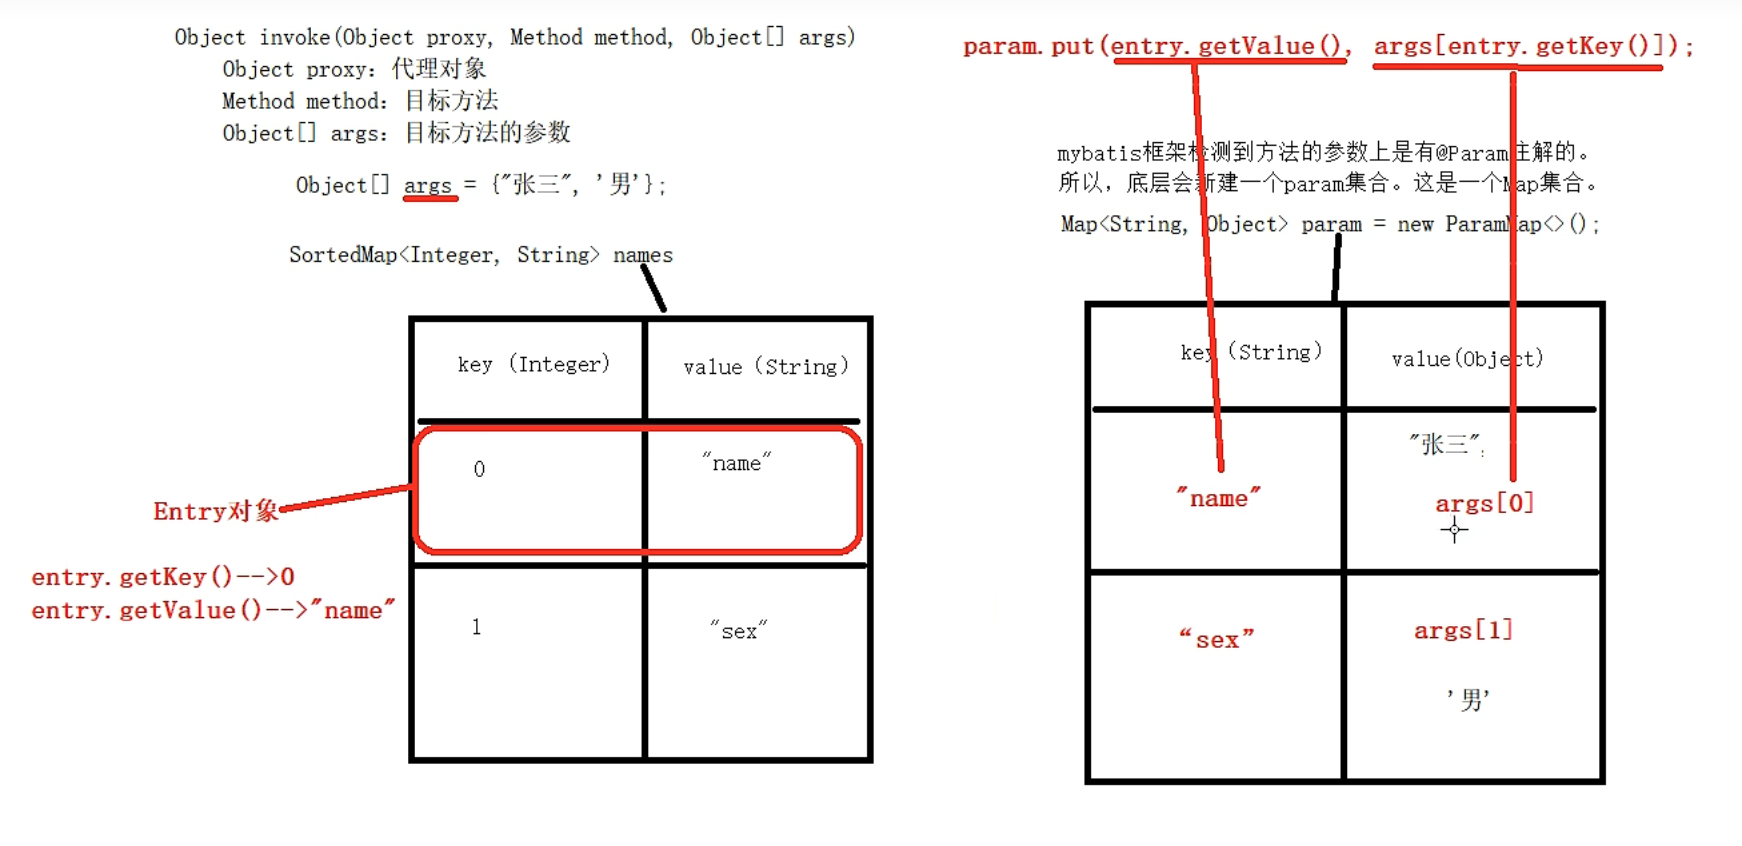
实现原理:实际上在mybatis底层会创建一个map集合,以arg0/param1为key,以方法上的参数为value,例如以下代码:
1 | Map<String,Object> map = new HashMap<>(); |
注意:使用mybatis****3.4.2之前的版本时:要用#{0}和#{1}这种形式。
@Param注解—–>解决方案一的痛点
可以不用arg0 arg1 param1 param2吗?这个map集合的key我们自定义可以吗?当然可以。使用@Param注解即可。这样可以增强可读性。
实际上在mybatis底层会创建一个map集合,以arg0/param1为key,以方法上的参数为value.
可以通过 @Param 指定 传入参数 在 mybatis 底层创建 的mapper 对应的 keyName。
使用方法
1 |
使用案例
1 | List<Student> selectByNameAndAge( String name, int age); |
注意
使用 @param 直接后,arg0 和 argxxx 会失效,但 param0 和 param1 还可以使用。
注解的原理。
方案:二、使用mapper集合
方案:三、使用 pojo(domain) 类
二、单参数
直接传入参数即可,mybatis 会直接将传入的值添加到 对应的地方。
底层是 将占位符 #{xxx} 直接转换为 ?然后调用 selectOne 方法。即xxx里填什么都没关系。
③、一些技巧
1.使用 sql 自动生成的主键,并将其保存到一个地方。
前提是:主键是自动生成的。
业务背景:一个用户有多个角色。
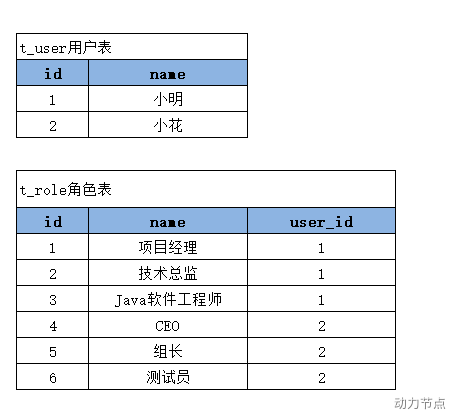
插入一条新的记录之后,自动生成了主键,而这个主键需要在其他表中使用时。
插入一个用户数据的同时需要给该用户分配角色:需要将生成的用户的id插入到角色表的user_id字段上。
第一种方式:可以先插入用户数据,再写一条查询语句获取id,然后再插入user_id字段。【比较麻烦】
第二种方式:mybatis提供了一种方式更加便捷。
方法步骤
在 mapper.xml 映射文件中
- 1.配置 useGeneratedKeys=”true”
keyProperty=”储存主键的字段名。”1
2
3
4
5
6
7例如
<insert id="insertUseGeneratedKeys" useGeneratedKeys="true" keyProperty="id">
insert into t_car(id,car_num,brand,guide_price,produce_time,car_type) values(null,#{carNum},#{brand},#{guidePrice},#{produceTime},#{carType})
</insert>
即可在传入的 对象中使用 对象.id 得到1
2
3
4
5
6
7
8
9
10
11
12
13
14
public void testInsertUseGeneratedKeys(){
CarMapper mapper = SqlSessionUtil.openSession().getMapper(CarMapper.class);
Car car = new Car();
car.setCarNum("5262");
car.setBrand("BYD汉");
car.setGuidePrice(30.3);
car.setProduceTime("2020-10-11");
car.setCarType("新能源");
mapper.insertUseGeneratedKeys(car);
SqlSessionUtil.openSession().commit();
====================
System.out.println(car.getId());
}
- 1.配置 useGeneratedKeys=”true”
2.结果映射
1).使用 resultmapper
② 使用驼峰命名自动映射。、
使用这种方式的前提是:属性名遵循Java的命名规范,数据库表的列名遵循SQL的命名规范。
Java命名规范:首字母小写,后面每个单词首字母大写,遵循驼峰命名方式。
SQL命名规范:全部小写,单词之间采用下划线分割。
比如以下的对应关系:
| 实体类中的属性名 | 数据库表的列名 |
|---|---|
| carNum | car_num |
| carType | car_type |
| produceTime | produce_time |
3.创建 大 maper
4.模糊查询
两种拼接方法
1 | 1.双引号大法 ---> 单引号不行,已经试过了。 |
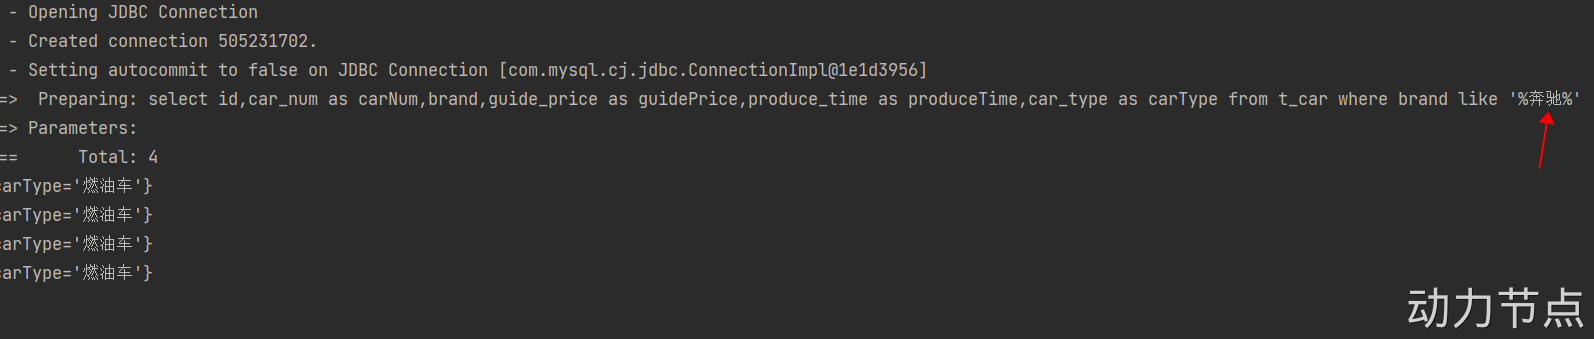
需求:查询奔驰系列的汽车。【只要品牌brand中含有奔驰两个字的都查询出来。】
使用${}
1 | /** |
执行结果:
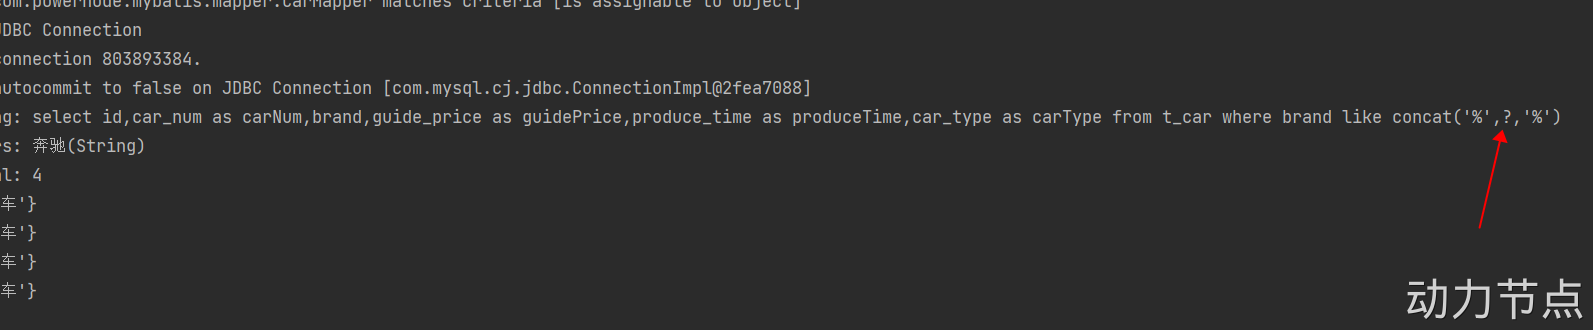
使用#{}
第一种:concat函数
1 | <select id="selectLikeByBrand" resultType="Car"> |
执行结果:
第二种:双引号方式
1 | <select id="selectLikeByBrand" resultType="Car"> |

④、底层原理
一、getMapper 的原理
简要描述:
通过 javassit 生成 dao 接口的代理类。然后 使用字符拼接的方式实现 dao 接口 要实现的方法体。
细节。
1 | mybatis基本程序 |
String sqlId = daoInterface.getName() + “.” + methodName;
- daointerface.getName() 获取了接口的全类名
- methodName 前面获取了 daointerface 中对应的方法名
==这一步 限定了 mapper 文件里 的namespacce必须为接口的全类名,id为方法名。==
eg:
2
3
4
5
6
7
8
9
10
<insert id="insert"→方法名 </insert> useGeneratedKeys="true" keyProperty="grade" >
insert into
salgrade(grade,losal,hisal)
values
(null,#{losal},#{hisal})
</insert>
</mapper>
⑤动态 SQL
1.拼接 where
一个技巧
where 1=1 不会影响条件

