1 回顾注解
注解的存在主要是为了简化XML的配置。Spring6倡导全注解开发。
我们来回顾一下:
- 第一:注解怎么定义,注解中的属性怎么定义?
- 第二:注解怎么使用?
- 第三:通过反射机制怎么读取注解?
1.1注解怎么定义,注解中的属性怎么定义?
1
2
3
4
5
6
7
8
9
10
11
12
| package com.powernode.annotation;
import java.lang.annotation.ElementType;
import java.lang.annotation.Retention;
import java.lang.annotation.RetentionPolicy;
import java.lang.annotation.Target;
@Target(value = {ElementType.TYPE})
@Retention(value = RetentionPolicy.RUNTIME)
public @interface Component {
String value();
}
|
以上是自定义了一个注解:Component
该注解上面修饰的注解包括:Target 注解和 Retention 注解,这两个注解被称为元注解。
元注解:用来注解 注解 的注解。
两个重要的标签
定义的属性
- String value(); 是Component注解中的一个属性。
1.2.注解怎么使用?
1
2
3
4
5
6
7
| package com.powernode.bean;
import com.powernode.annotation.Component;
@Component(value = "userBean")
public class User {
}
|
语法格式:
- @注解类型名(属性名=属性值, 属性名=属性值, 属性名=属性值……)
userBean为什么使用双引号括起来,因为value属性是String类型,字符串。
另外如果属性名是value,则在使用的时候可以省略属性名,例如:
1
2
3
4
5
6
7
8
| package com.powernode.bean;
import com.powernode.annotation.Component;
@Component("userBean")
public class User {
}
|
通过反射机制怎么读取注解?
—————–>类的clazz对象.isAnnotationPresent(注解的class对象)
接下来,我们来写一段程序,当Bean类上有Component注解时,则实例化Bean对象,如果没有,则不实例化对象。
我们准备两个Bean,一个上面有注解,一个上面没有注解。
1
2
3
4
5
6
7
8
9
10
11
| package com.powernode.bean;
import com.powernode.annotation.Component;
@Component("userBean")
public class User {
}
package com.powernode.bean;
public class Vip {
}
|
假设我们现在只知道包名:com.powernode.bean。至于这个包下有多少个Bean我们不知道。哪些Bean上有注解,哪些Bean上没有注解,这些我们都不知道,如何通过程序全自动化判断。
1
2
3
4
5
6
7
8
9
10
11
12
13
14
15
16
17
18
19
20
21
22
23
24
25
26
27
28
29
30
31
32
33
34
35
36
37
38
39
40
41
42
43
44
45
| package com.powernode.test;
import com.powernode.annotation.Component;
import java.io.File;
import java.net.URL;
import java.util.Arrays;
import java.util.Enumeration;
import java.util.HashMap;
import java.util.Map;
public class Test {
public static void main(String[] args) throws Exception {
Map<String,Object> beanMap = new HashMap<>();
String packageName = "com.powernode.bean";
String path = packageName.replaceAll("\\.", "/");
URL url = ClassLoader.getSystemClassLoader().getResource(path);
File file = new File(url.getPath());
File[] files = file.listFiles();
Arrays.stream(files).forEach(f -> {
String className = packageName + "." + f.getName().split("\\.")[0];
try {
Class<?> clazz = Class.forName(className);
if (clazz.isAnnotationPresent(Component.class)) {
Component component = clazz.getAnnotation(Component.class);
String beanId = component.value();
Object bean = clazz.newInstance();
beanMap.put(beanId, bean);
}
} catch (Exception e) {
e.printStackTrace();
}
});
System.out.println(beanMap);
}
}
|
执行结果:

2 声明Bean的注解
负责声明Bean的注解,常见的包括四个:
- @Component 其余三个是第一个的别名。
- @Controller
- @Service
- @Repository
源码如下:
1
2
3
4
5
6
7
8
9
10
11
12
13
14
15
16
17
18
19
20
21
22
23
24
25
26
27
28
29
30
31
32
33
34
35
36
37
38
39
40
41
42
43
44
45
46
47
48
49
50
51
52
53
54
55
56
57
58
59
60
61
62
63
64
65
66
67
68
69
| package com.powernode.annotation;
import java.lang.annotation.ElementType;
import java.lang.annotation.Retention;
import java.lang.annotation.RetentionPolicy;
import java.lang.annotation.Target;
@Target(value = {ElementType.TYPE})
@Retention(value = RetentionPolicy.RUNTIME)
public @interface Component {
String value();
}
package org.springframework.stereotype;
import java.lang.annotation.Documented;
import java.lang.annotation.ElementType;
import java.lang.annotation.Retention;
import java.lang.annotation.RetentionPolicy;
import java.lang.annotation.Target;
import org.springframework.core.annotation.AliasFor;
@Target({ElementType.TYPE})
@Retention(RetentionPolicy.RUNTIME)
@Documented
@Component
public @interface Controller {
@AliasFor(
annotation = Component.class
)
String value() default "";
}
package org.springframework.stereotype;
import java.lang.annotation.Documented;
import java.lang.annotation.ElementType;
import java.lang.annotation.Retention;
import java.lang.annotation.RetentionPolicy;
import java.lang.annotation.Target;
import org.springframework.core.annotation.AliasFor;
@Target({ElementType.TYPE})
@Retention(RetentionPolicy.RUNTIME)
@Documented
@Component
public @interface Service {
@AliasFor(
annotation = Component.class
)
String value() default "";
}
package org.springframework.stereotype;
import java.lang.annotation.Documented;
import java.lang.annotation.ElementType;
import java.lang.annotation.Retention;
import java.lang.annotation.RetentionPolicy;
import java.lang.annotation.Target;
import org.springframework.core.annotation.AliasFor;
@Target({ElementType.TYPE})
@Retention(RetentionPolicy.RUNTIME)
@Documented
@Component
public @interface Repository {
@AliasFor(
annotation = Component.class
)
String value() default "";
}
|
通过源码可以看到,@Controller、@Service、@Repository这三个注解都是@Component注解的别名。
也就是说:这四个注解的功能都一样。用哪个都可以。
只是为了增强程序的可读性,建议:
- 控制器类上使用:Controller
- service类上使用:Service
- dao类上使用:Repository
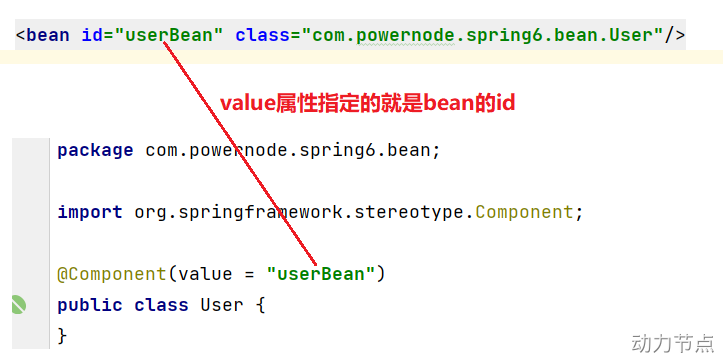
他们都是只有一个value属性。value属性用来指定bean的id,也就是bean的名字。
3 Spring注解的使用
如何使用以上的注解呢?
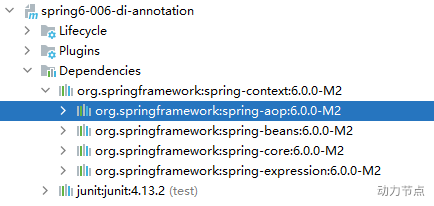
- 第一步:加入aop的依赖
- 第二步:在配置文件中添加context命名空间
- 第三步:在配置文件中指定扫描的包
- 第四步:在Bean类上使用注解
第一步:加入aop的依赖
我们可以看到当加入spring-context依赖之后,会关联加入aop的依赖。所以这一步不用做。
第二步:在配置文件中添加context命名空间
1
2
3
4
5
6
7
8
| <?xml version="1.0" encoding="UTF-8"?>
<beans xmlns="http://www.springframework.org/schema/beans"
xmlns:xsi="http://www.w3.org/2001/XMLSchema-instance"
xmlns:context="http://www.springframework.org/schema/context"
xsi:schemaLocation="http://www.springframework.org/schema/beans http://www.springframework.org/schema/beans/spring-beans.xsd
http://www.springframework.org/schema/context http://www.springframework.org/schema/context/spring-context.xsd">
</beans>
|
第三步:在配置文件中指定要扫描的包
1
2
3
4
5
6
7
8
| <?xml version="1.0" encoding="UTF-8"?>
<beans xmlns="http://www.springframework.org/schema/beans"
xmlns:xsi="http://www.w3.org/2001/XMLSchema-instance"
xmlns:context="http://www.springframework.org/schema/context"
xsi:schemaLocation="http://www.springframework.org/schema/beans http://www.springframework.org/schema/beans/spring-beans.xsd
http://www.springframework.org/schema/context http://www.springframework.org/schema/context/spring-context.xsd">
<context:component-scan base-package="com.powernode.spring6.bean"/>
</beans>
|
第四步:在Bean类上使用注解
1
2
3
4
5
6
7
| package com.powernode.spring6.bean;
import org.springframework.stereotype.Component;
@Component(value = "userBean")
public class User {
}
|
编写测试程序:
1
2
3
4
5
6
7
8
9
10
11
12
13
14
15
| package com.powernode.spring6.test;
import com.powernode.spring6.bean.User;
import org.junit.Test;
import org.springframework.context.ApplicationContext;
import org.springframework.context.support.ClassPathXmlApplicationContext;
public class AnnotationTest {
@Test
public void testBean(){
ApplicationContext applicationContext = new ClassPathXmlApplicationContext("spring.xml");
User userBean = applicationContext.getBean("userBean", User.class);
System.out.println(userBean);
}
}
|
执行结果:

如果注解的属性名是value,那么value是可以省略的。
1
2
3
4
5
6
7
8
9
10
11
12
13
14
15
16
17
18
19
20
21
22
| package com.powernode.spring6.bean;
import org.springframework.stereotype.Component;
@Component("vipBean")
public class Vip {
}
package com.powernode.spring6.test;
import com.powernode.spring6.bean.Vip;
import org.junit.Test;
import org.springframework.context.ApplicationContext;
import org.springframework.context.support.ClassPathXmlApplicationContext;
public class AnnotationTest {
@Test
public void testBean(){
ApplicationContext applicationContext = new ClassPathXmlApplicationContext("spring.xml");
Vip vipBean = applicationContext.getBean("vipBean", Vip.class);
System.out.println(vipBean);
}
}
|
执行结果:

如果把value属性彻底去掉,spring会被Bean自动取名吗?会的。并且默认名字的规律是:Bean类名首字母小写即可。
1
2
3
4
5
6
7
| package com.powernode.spring6.bean;
import org.springframework.stereotype.Component;
@Component
public class BankDao {
}
|
也就是说,这个BankDao的bean的名字为:bankDao
测试一下
1
2
3
4
5
6
7
8
9
10
11
12
13
14
15
| package com.powernode.spring6.test;
import com.powernode.spring6.bean.BankDao;
import org.junit.Test;
import org.springframework.context.ApplicationContext;
import org.springframework.context.support.ClassPathXmlApplicationContext;
public class AnnotationTest {
@Test
public void testBean(){
ApplicationContext applicationContext = new ClassPathXmlApplicationContext("spring.xml");
BankDao bankDao = applicationContext.getBean("bankDao", BankDao.class);
System.out.println(bankDao);
}
}
|
执行结果:

我们将Component注解换成其它三个注解,看看是否可以用:
1
2
3
4
5
6
7
| package com.powernode.spring6.bean;
import org.springframework.stereotype.Controller;
@Controller
public class BankDao {
}
|
执行结果:

剩下的两个注解大家可以测试一下。
如果是多个包怎么办?有两种解决方案:
- 第一种:在配置文件中指定多个包,用逗号隔开。
- 第二种:指定多个包的共同父包。
先来测试一下逗号(英文)的方式:
创建一个新的包:bean2,定义一个Bean类。
1
2
3
4
5
6
7
| package com.powernode.spring6.bean2;
import org.springframework.stereotype.Service;
@Service
public class Order {
}
|
配置文件修改:
1
2
3
4
5
6
7
8
| <?xml version="1.0" encoding="UTF-8"?>
<beans xmlns="http://www.springframework.org/schema/beans"
xmlns:xsi="http://www.w3.org/2001/XMLSchema-instance"
xmlns:context="http://www.springframework.org/schema/context"
xsi:schemaLocation="http://www.springframework.org/schema/beans http://www.springframework.org/schema/beans/spring-beans.xsd
http://www.springframework.org/schema/context http://www.springframework.org/schema/context/spring-context.xsd">
<context:component-scan base-package="com.powernode.spring6.bean,com.powernode.spring6.bean2"/>
</beans>
|
测试程序:
1
2
3
4
5
6
7
8
9
10
11
12
13
14
15
16
17
18
| package com.powernode.spring6.test;
import com.powernode.spring6.bean.BankDao;
import com.powernode.spring6.bean2.Order;
import org.junit.Test;
import org.springframework.context.ApplicationContext;
import org.springframework.context.support.ClassPathXmlApplicationContext;
public class AnnotationTest {
@Test
public void testBean(){
ApplicationContext applicationContext = new ClassPathXmlApplicationContext("spring.xml");
BankDao bankDao = applicationContext.getBean("bankDao", BankDao.class);
System.out.println(bankDao);
Order order = applicationContext.getBean("order", Order.class);
System.out.println(order);
}
}
|
执行结果:

我们再来看看,指定共同的父包行不行:
1
2
3
4
5
6
7
8
| <?xml version="1.0" encoding="UTF-8"?>
<beans xmlns="http://www.springframework.org/schema/beans"
xmlns:xsi="http://www.w3.org/2001/XMLSchema-instance"
xmlns:context="http://www.springframework.org/schema/context"
xsi:schemaLocation="http://www.springframework.org/schema/beans http://www.springframework.org/schema/beans/spring-beans.xsd
http://www.springframework.org/schema/context http://www.springframework.org/schema/context/spring-context.xsd">
<context:component-scan base-package="com.powernode.spring6"/>
</beans>
|
执行测试程序:

4 选择性实例化Bean
假设在某个包下有很多Bean,有的Bean上标注了Component,有的标注了Controller,有的标注了Service,有的标注了Repository,现在由于某种特殊业务的需要,只允许其中所有的Controller参与Bean管理,其他的都不实例化。这应该怎么办呢?
1
2
3
4
5
6
7
8
9
10
11
12
13
14
15
16
17
18
19
20
21
22
23
24
25
26
27
28
29
30
31
32
33
34
35
36
37
38
39
40
41
42
43
44
45
46
47
48
| package com.powernode.spring6.bean3;
import org.springframework.stereotype.Component;
import org.springframework.stereotype.Controller;
import org.springframework.stereotype.Repository;
import org.springframework.stereotype.Service;
@Component
public class A {
public A() {
System.out.println("A的无参数构造方法执行");
}
}
@Controller
class B {
public B() {
System.out.println("B的无参数构造方法执行");
}
}
@Service
class C {
public C() {
System.out.println("C的无参数构造方法执行");
}
}
@Repository
class D {
public D() {
System.out.println("D的无参数构造方法执行");
}
}
@Controller
class E {
public E() {
System.out.println("E的无参数构造方法执行");
}
}
@Controller
class F {
public F() {
System.out.println("F的无参数构造方法执行");
}
}
|
我只想实例化bean3包下的Controller。配置文件这样写:
1
2
3
4
5
6
7
8
9
10
11
12
| <?xml version="1.0" encoding="UTF-8"?>
<beans xmlns="http://www.springframework.org/schema/beans"
xmlns:xsi="http://www.w3.org/2001/XMLSchema-instance"
xmlns:context="http://www.springframework.org/schema/context"
xsi:schemaLocation="http://www.springframework.org/schema/beans http://www.springframework.org/schema/beans/spring-beans.xsd
http://www.springframework.org/schema/context http://www.springframework.org/schema/context/spring-context.xsd">
<context:component-scan base-package="com.powernode.spring6.bean3" use-default-filters="false">
<context:include-filter type="annotation" expression="org.springframework.stereotype.Controller"/>
</context:component-scan>
</beans>
|
use-default-filters=”true” 表示:使用spring默认的规则,只要有Component、Controller、Service、Repository中的任意一个注解标注,则进行实例化。
use-default-filters=”false” 表示:不再spring默认实例化规则,即使有Component、Controller、Service、Repository这些注解标注,也不再实例化。
<context:include-filter type=”annotation” expression=”org.springframework.stereotype.Controller”/> 表示只有Controller进行实例化。
1
2
3
4
| @Test
public void testChoose(){
ApplicationContext applicationContext = new ClassPathXmlApplicationContext("spring-choose.xml");
}
|
执行结果:
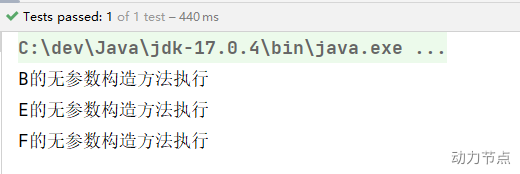
也可以将use-default-filters设置为true(不写就是true),并且采用exclude-filter方式排出哪些注解标注的Bean不参与实例化:
1
2
3
4
5
| <context:component-scan base-package="com.powernode.spring6.bean3">
<context:exclude-filter type="annotation" expression="org.springframework.stereotype.Repository"/>
<context:exclude-filter type="annotation" expression="org.springframework.stereotype.Service"/>
<context:exclude-filter type="annotation" expression="org.springframework.stereotype.Controller"/>
</context:component-scan>
|
执行测试程序:

5 负责注入的注解
@Component @Controller @Service @Repository 这四个注解是用来声明Bean的,声明后这些Bean将被实例化。接下来我们看一下,如何给Bean的属性赋值。给Bean属性赋值需要用到这些注解:
- @Value —>简单类型
- @Autowired ——–>根据类型注入
- @Qualifier —->配合上面使用名字注入
- @Resource —>J
5.1 @Value
当属性的类型是简单类型时,可以使用@Value注解进行注入。
1
2
3
4
5
6
7
8
9
10
11
12
13
14
15
16
17
18
19
20
| package com.powernode.spring6.bean4;
import org.springframework.beans.factory.annotation.Value;
import org.springframework.stereotype.Component;
@Component
public class User {
@Value(value = "zhangsan")
private String name;
@Value("20")
private int age;
@Override
public String toString() {
return "User{" +
"name='" + name + '\'' +
", age=" + age +
'}';
}
}
|
开启包扫描:
1
2
3
4
5
6
7
8
9
10
11
12
13
14
| <?xml version="1.0" encoding="UTF-8"?>
<beans xmlns="http://www.springframework.org/schema/beans"
xmlns:xsi="http://www.w3.org/2001/XMLSchema-instance"
xmlns:context="http://www.springframework.org/schema/context"
xsi:schemaLocation="http://www.springframework.org/schema/beans http://www.springframework.org/schema/beans/spring-beans.xsd
http://www.springframework.org/schema/context http://www.springframework.org/schema/context/spring-context.xsd">
<context:component-scan base-package="com.powernode.spring6.bean4"/>
</beans>
@Test
public void testValue(){
ApplicationContext applicationContext = new ClassPathXmlApplicationContext("spring-injection.xml");
Object user = applicationContext.getBean("user");
System.out.println(user);
}
|
执行结果:

通过以上代码可以发现,我们并没有给属性提供setter方法,但仍然可以完成属性赋值。
如果提供setter方法,并且在setter方法上添加@Value注解,可以完成注入吗?尝试一下:
1
2
3
4
5
6
7
8
9
10
11
12
13
14
15
16
17
18
19
20
21
22
23
24
25
26
27
28
29
30
| package com.powernode.spring6.bean4;
import org.springframework.beans.factory.annotation.Value;
import org.springframework.stereotype.Component;
@Component
public class User {
private String name;
private int age;
@Value("李四")
public void setName(String name) {
this.name = name;
}
@Value("30")
public void setAge(int age) {
this.age = age;
}
@Override
public String toString() {
return "User{" +
"name='" + name + '\'' +
", age=" + age +
'}';
}
}
|
执行结果:

通过测试可以得知,@Value注解可以直接使用在属性上,也可以使用在setter方法上。都是可以的。都可以完成属性的赋值。
为了简化代码,以后我们一般不提供setter方法,直接在属性上使用@Value注解完成属性赋值。
出于好奇,我们再来测试一下,是否能够通过构造方法完成注入:
1
2
3
4
5
6
7
8
9
10
11
12
13
14
15
16
17
18
19
20
21
22
23
24
25
| package com.powernode.spring6.bean4;
import org.springframework.beans.factory.annotation.Value;
import org.springframework.stereotype.Component;
@Component
public class User {
private String name;
private int age;
public User(@Value("隔壁老王") String name, @Value("33") int age) {
this.name = name;
this.age = age;
}
@Override
public String toString() {
return "User{" +
"name='" + name + '\'' +
", age=" + age +
'}';
}
}
|
执行结果:

通过测试得知:@Value注解可以出现在属性上、setter方法上、以及构造方法的形参上。可见Spring给我们提供了多样化的注入。太灵活了。
5.2 @Autowired与@Qualifier
@Autowired注解可以用来注入非简单类型。被翻译为:自动连线的,或者自动装配。
单独使用@Autowired注解,默认根据类型装配。【默认是byType】
看一下它的源码:
1
2
3
4
5
6
7
8
9
10
11
12
13
14
| package org.springframework.beans.factory.annotation;
import java.lang.annotation.Documented;
import java.lang.annotation.ElementType;
import java.lang.annotation.Retention;
import java.lang.annotation.RetentionPolicy;
import java.lang.annotation.Target;
@Target({ElementType.CONSTRUCTOR, ElementType.METHOD, ElementType.PARAMETER, ElementType.FIELD, ElementType.ANNOTATION_TYPE})
@Retention(RetentionPolicy.RUNTIME)
@Documented
public @interface Autowired {
boolean required() default true;
}
|
源码中有两处需要注意:
我们先在属性上使用@Autowired注解:
1
2
3
4
5
6
7
8
9
10
11
12
13
14
15
16
17
18
19
20
21
22
23
24
25
26
27
28
29
30
31
32
33
34
35
36
37
38
39
40
41
42
43
44
45
46
47
48
| package com.powernode.spring6.dao;
public interface UserDao {
void insert();
}
package com.powernode.spring6.dao;
import org.springframework.stereotype.Repository;
@Repository
public class UserDaoForMySQL implements UserDao{
@Override
public void insert() {
System.out.println("正在向mysql数据库插入User数据");
}
}
package com.powernode.spring6.service;
import com.powernode.spring6.dao.UserDao;
import org.springframework.beans.factory.annotation.Autowired;
import org.springframework.stereotype.Service;
@Service
public class UserService {
@Autowired
private UserDao userDao;
public void save(){
userDao.insert();
}
}
<?xml version="1.0" encoding="UTF-8"?>
<beans xmlns="http://www.springframework.org/schema/beans"
xmlns:xsi="http://www.w3.org/2001/XMLSchema-instance"
xmlns:context="http://www.springframework.org/schema/context"
xsi:schemaLocation="http://www.springframework.org/schema/beans http://www.springframework.org/schema/beans/spring-beans.xsd
http://www.springframework.org/schema/context http://www.springframework.org/schema/context/spring-context.xsd">
<context:component-scan base-package="com.powernode.spring6.dao,com.powernode.spring6.service"/>
</beans>
@Test
public void testAutowired(){
ApplicationContext applicationContext = new ClassPathXmlApplicationContext("spring-injection.xml");
UserService userService = applicationContext.getBean("userService", UserService.class);
userService.save();
}
|
执行结果:

以上构造方法和setter方法都没有提供,经过测试,仍然可以注入成功。
接下来,再来测试一下@Autowired注解出现在setter方法上:
1
2
3
4
5
6
7
8
9
10
11
12
13
14
15
16
17
18
19
20
| package com.powernode.spring6.service;
import com.powernode.spring6.dao.UserDao;
import org.springframework.beans.factory.annotation.Autowired;
import org.springframework.stereotype.Service;
@Service
public class UserService {
private UserDao userDao;
@Autowired
public void setUserDao(UserDao userDao) {
this.userDao = userDao;
}
public void save(){
userDao.insert();
}
}
|
执行结果:

我们再来看看能不能出现在构造方法上:
1
2
3
4
5
6
7
8
9
10
11
12
13
14
15
16
17
18
19
20
| package com.powernode.spring6.service;
import com.powernode.spring6.dao.UserDao;
import org.springframework.beans.factory.annotation.Autowired;
import org.springframework.stereotype.Service;
@Service
public class UserService {
private UserDao userDao;
@Autowired
public UserService(UserDao userDao) {
this.userDao = userDao;
}
public void save(){
userDao.insert();
}
}
|
执行结果:

再来看看,这个注解能不能只标注在构造方法的形参上:
1
2
3
4
5
6
7
8
9
10
11
12
13
14
15
16
17
18
19
| package com.powernode.spring6.service;
import com.powernode.spring6.dao.UserDao;
import org.springframework.beans.factory.annotation.Autowired;
import org.springframework.stereotype.Service;
@Service
public class UserService {
private UserDao userDao;
public UserService(@Autowired UserDao userDao) {
this.userDao = userDao;
}
public void save(){
userDao.insert();
}
}
|
执行结果:

还有更劲爆的,当有参数的构造方法只有一个时,@Autowired注解可以省略。
1
2
3
4
5
6
7
8
9
10
11
12
13
14
15
16
17
18
| package com.powernode.spring6.service;
import com.powernode.spring6.dao.UserDao;
import org.springframework.stereotype.Service;
@Service
public class UserService {
private UserDao userDao;
public UserService(UserDao userDao) {
this.userDao = userDao;
}
public void save(){
userDao.insert();
}
}
|
执行结果:

当然,如果有多个构造方法,@Autowired肯定是不能省略的。
1
2
3
4
5
6
7
8
9
10
11
12
13
14
15
16
17
18
19
20
21
22
| package com.powernode.spring6.service;
import com.powernode.spring6.dao.UserDao;
import org.springframework.stereotype.Service;
@Service
public class UserService {
private UserDao userDao;
public UserService(UserDao userDao) {
this.userDao = userDao;
}
public UserService(){
}
public void save(){
userDao.insert();
}
}
|
执行结果:

到此为止,我们已经清楚@Autowired注解可以出现在哪些位置了。
@Autowired注解默认是byType进行注入的,也就是说根据类型注入的,如果以上程序中,UserDao接口还有另外一个实现类,会出现问题吗?
1
2
3
4
5
6
7
8
9
10
11
| package com.powernode.spring6.dao;
import org.springframework.stereotype.Repository;
@Repository
public class UserDaoForOracle implements UserDao{
@Override
public void insert() {
System.out.println("正在向Oracle数据库插入User数据");
}
}
|
当你写完这个新的实现类之后,此时IDEA工具已经提示错误信息了:
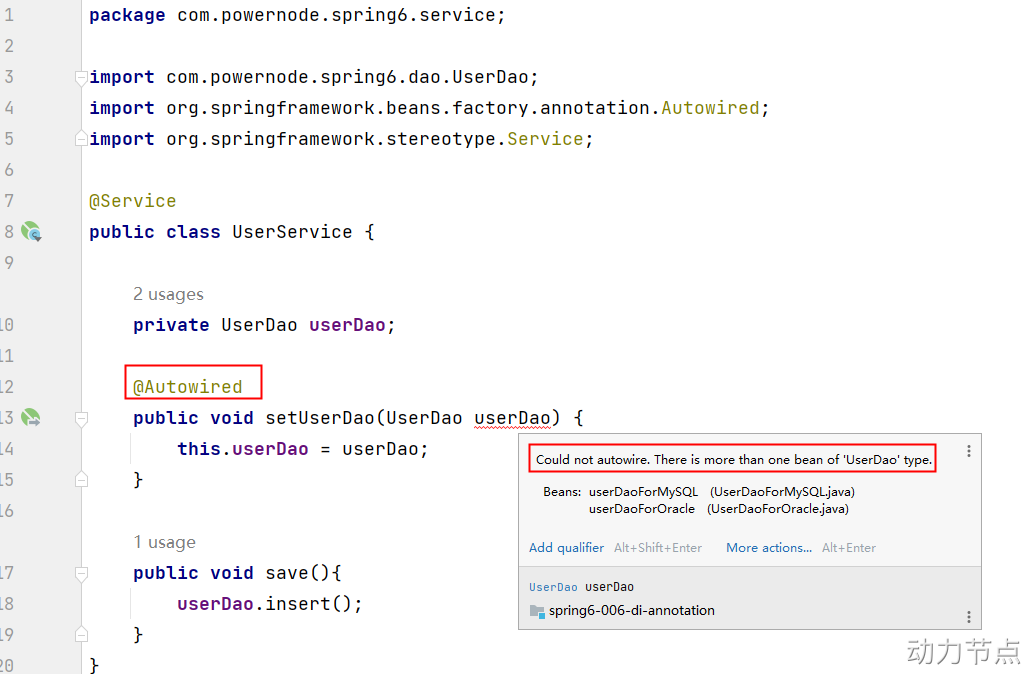
错误信息中说:不能装配,UserDao这个Bean的数量大于1.
怎么解决这个问题呢?当然要byName,根据名称进行装配了。
@Autowired注解和@Qualifier注解联合起来才可以根据名称进行装配,在@Qualifier注解中指定Bean名称。
1
2
3
4
5
6
7
8
9
10
11
12
13
14
15
16
17
18
19
20
21
22
23
24
25
26
27
28
29
30
31
32
33
| package com.powernode.spring6.dao;
import org.springframework.stereotype.Repository;
@Repository
public class UserDaoForOracle implements UserDao{
@Override
public void insert() {
System.out.println("正在向Oracle数据库插入User数据");
}
}
package com.powernode.spring6.service;
import com.powernode.spring6.dao.UserDao;
import org.springframework.beans.factory.annotation.Autowired;
import org.springframework.beans.factory.annotation.Qualifier;
import org.springframework.stereotype.Service;
@Service
public class UserService {
private UserDao userDao;
@Autowired
@Qualifier("userDaoForOracle")
public void setUserDao(UserDao userDao) {
this.userDao = userDao;
}
public void save(){
userDao.insert();
}
}
|
执行结果:

总结:
- @Autowired注解可以出现在:属性上、构造方法上、构造方法的参数上、setter方法上。
- 当带参数的构造方法只有一个,@Autowired注解可以省略。
- @Autowired注解默认根据类型注入。如果要根据名称注入的话,需要配合@Qualifier注解一起使用。
5.3 @Resource
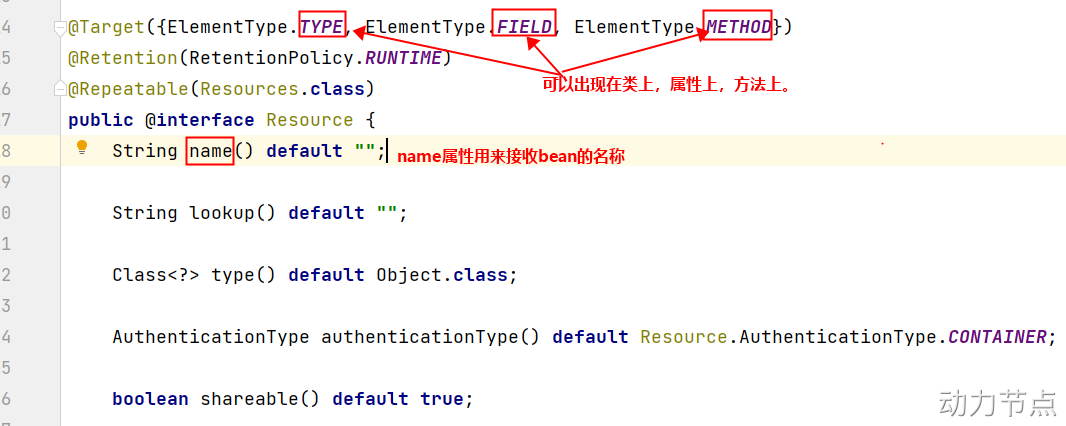
@Resource注解也可以完成非简单类型注入。那它和@Autowired注解有什么区别?
- @Resource注解是JDK扩展包中的,也就是说属于JDK的一部分。所以该注解是标准注解,更加具有通用性。(JSR-250标准中制定的注解类型。JSR是Java规范提案。)
- @Autowired注解是Spring框架自己的。
- @Resource注解默认根据名称装配byName,未指定name时,使用属性名作为name。通过name找不到的话会自动启动通过类型byType装配。
- @Autowired注解默认根据类型装配byType,如果想根据名称装配,需要配合@Qualifier注解一起用。
- @Resource注解用在属性上、setter方法上。
- @Autowired注解用在属性上、setter方法上、构造方法上、构造方法参数上。
@Resource注解属于JDK扩展包,所以不在JDK当中,需要额外引入以下依赖:【如果是JDK8的话不需要额外引入依赖。高于JDK11或低于JDK8需要引入以下依赖。】
1
2
3
4
5
| <dependency>
<groupId>jakarta.annotation</groupId>
<artifactId>jakarta.annotation-api</artifactId>
<version>2.1.1</version>
</dependency>
|
一定要注意:如果你用Spring6,要知道Spring6不再支持JavaEE,它支持的是JakartaEE9。(Oracle把JavaEE贡献给Apache了,Apache把JavaEE的名字改成JakartaEE了,大家之前所接触的所有的 javax.* 包名统一修改为 jakarta.*包名了。)
1
2
3
4
5
| <dependency>
<groupId>javax.annotation</groupId>
<artifactId>javax.annotation-api</artifactId>
<version>1.3.2</version>
</dependency>
|
@Resource注解的源码如下:
测试一下:
1
2
3
4
5
6
7
8
9
10
11
12
13
14
15
16
17
18
19
20
21
22
23
24
25
26
27
| package com.powernode.spring6.dao;
import org.springframework.stereotype.Repository;
@Repository("xyz")
public class UserDaoForOracle implements UserDao{
@Override
public void insert() {
System.out.println("正在向Oracle数据库插入User数据");
}
}
package com.powernode.spring6.service;
import com.powernode.spring6.dao.UserDao;
import jakarta.annotation.Resource;
import org.springframework.stereotype.Service;
@Service
public class UserService {
@Resource(name = "xyz")
private UserDao userDao;
public void save(){
userDao.insert();
}
}
|
执行测试程序:

我们把UserDaoForOracle的名字xyz修改为userDao,让这个Bean的名字和UserService类中的UserDao属性名一致:
1
2
3
4
5
6
7
8
9
10
11
12
13
14
15
16
17
18
19
20
21
22
23
24
25
26
27
| package com.powernode.spring6.dao;
import org.springframework.stereotype.Repository;
@Repository("userDao")
public class UserDaoForOracle implements UserDao{
@Override
public void insert() {
System.out.println("正在向Oracle数据库插入User数据");
}
}
package com.powernode.spring6.service;
import com.powernode.spring6.dao.UserDao;
import jakarta.annotation.Resource;
import org.springframework.stereotype.Service;
@Service
public class UserService {
@Resource
private UserDao userDao;
public void save(){
userDao.insert();
}
}
|
执行测试程序:

通过测试得知,当@Resource注解使用时没有指定name的时候,还是根据name进行查找,这个name是属性名。
接下来把UserService类中的属性名修改一下:
1
2
3
4
5
6
7
8
9
10
11
12
13
14
15
16
| package com.powernode.spring6.service;
import com.powernode.spring6.dao.UserDao;
import jakarta.annotation.Resource;
import org.springframework.stereotype.Service;
@Service
public class UserService {
@Resource
private UserDao userDao2;
public void save(){
userDao2.insert();
}
}
|
执行结果:

根据异常信息得知:显然当通过name找不到的时候,自然会启动byType进行注入。以上的错误是因为UserDao接口下有两个实现类导致的。所以根据类型注入就会报错。
我们再来看@Resource注解使用在setter方法上可以吗?
1
2
3
4
5
6
7
8
9
10
11
12
13
14
15
16
17
18
19
20
| package com.powernode.spring6.service;
import com.powernode.spring6.dao.UserDao;
import jakarta.annotation.Resource;
import org.springframework.stereotype.Service;
@Service
public class UserService {
private UserDao userDao;
@Resource
public void setUserDao(UserDao userDao) {
this.userDao = userDao;
}
public void save(){
userDao.insert();
}
}
|
注意这个setter方法的方法名,setUserDao去掉set之后,将首字母变小写userDao,userDao就是name
执行结果:

当然,也可以指定name:
1
2
3
4
5
6
7
8
9
10
11
12
13
14
15
16
17
18
19
20
| package com.powernode.spring6.service;
import com.powernode.spring6.dao.UserDao;
import jakarta.annotation.Resource;
import org.springframework.stereotype.Service;
@Service
public class UserService {
private UserDao userDao;
@Resource(name = "userDaoForMySQL")
public void setUserDao(UserDao userDao) {
this.userDao = userDao;
}
public void save(){
userDao.insert();
}
}
|
执行结果:

一句话总结@Resource注解:默认byName注入,没有指定name时把属性名当做name,根据name找不到时,才会byType注入。byType注入时,某种类型的Bean只能有一个。
6 全注解式开发
所谓的全注解开发就是不再使用spring配置文件了。写一个配置类来代替配置文件。
1
2
3
4
5
6
7
8
9
10
| package com.powernode.spring6.config;
import org.springframework.context.annotation.ComponentScan;
import org.springframework.context.annotation.ComponentScans;
import org.springframework.context.annotation.Configuration;
@Configuration
@ComponentScan({"com.powernode.spring6.dao", "com.powernode.spring6.service"})
public class Spring6Configuration {
}
|
编写测试程序:不再new ClassPathXmlApplicationContext()对象了。
1
2
3
4
5
6
| @Test
public void testNoXml(){
ApplicationContext applicationContext = new AnnotationConfigApplicationContext(Spring6Configuration.class);
UserService userService = applicationContext.getBean("userService", UserService.class);
userService.save();
}
|
执行结果:


